What to do if the dial breaks off

If the dial breaks off or gets very difficult to turn, you have some options.

  1. You can send it to us for repair.  We’ll also give it a good tune up and replace any other internal components that sometime fail, that way you’ll not only get another dial, but also know the rest of your timer should keep working well for a long time.  (Our oldest timer that we’ve repaired and put back in service was dated 1991, so they have a lot of life in them).
  2. Do it yourself options:  You can contact Irritrol directly and ask them to send you a replacement plastic dial; they usually do.   They’re not too difficult to replace on your own.  Look at the irritrol.com website for their phone number.


Why does my Rain Dial Plus say Opn/Open

I often get questions about what it means when the timer says Opn or Open.  This message comes from the term ‘open circuit’ which means that the timer tried to turn on a valve, but the circuit was open, meaning a wire is disconnected, broken, or the solenoid is broken.

Typically this problem is caused by loose wiring or a bad solenoid.  Examine the connections at the timer and at the valves, typically found in a ground box.

It could also be caused by a timer or a back terminal board problem.  If your wiring looks good, you can send the timer and back terminal board to us for repair. 

If you only have one valve indicating an Open condition, you can try swapping wires with another valve to confirm that it’s a valve or wiring condition.  E.g., if station/valve #1 works and #2 is currently saying Open, then swap wires for #1 and #2.   Then try to turn on the 1st and 2nd stations using the timer’s manual function.  If the first station works and the 2nd station displays the Open message, then the problem is likely with the timer or backboard, send it in for repair.   If however, you now see station 1 reporting an open message, then the wire connections or solenoid is bad.  Solenoids usually fail shorted instead of open, but either is possible.  You can check either with a

Check wiring and/or replace the solenoid using the information below.

  1. Solenoids are usually easy to replace, just turn the water off, disconnect the wires, unscrew the solenoid and replace it.
  2. You can get them from your local landscape supply store (E.g, SprinklerWorld, or other, but probably not HomeDepot or Lowes). They’re usually less than $20.
  3. If you want to pick up the parts first, take a picture of the valve to the store with you. They’ll be able to tell from the picture what solenoid you need.
  4. Just turn the water off, disconnect the wires, unscrew the old solenoid; then put the new one in, hook the wires back up, and turn the water back on.

For additional testing, you can follow some of the steps to test the transformer.  Start with Check #3 on this page.  If you’re able to operate the valve, you know the transformer, wiring, and valve are good.

We hope this helps, if so, consider making a small donation on our donation page; we really appreciate it.

How to replace the transformer

Transformers rarely fail, and when they do, it’s usually caused by people not turning the power off when they are moving wires and the 24VAC wires touch.  Sometimes a failed solenoid could cause transformer problems but the timer usually shuts off and issues a FUS message before the transformer is damaged.  Some models also have fuses on the back terminal board that helps protect it.

A note of caution – the transformer is connected to your household 110/120VAC power, which is dangerous.  Be sure to take precautions by turning off the power before working on the unit.  You should not attempt it unless you are experienced enough to do so.  This post does not contain sufficient information to work with these voltages safely; If in doubt, contact someone who is qualified. 

Most of the time people think that the transformer is bad when it isn’t,  Follow the DIY page topic on ‘How to test if the transformer is good’ to know for sure.

Testing the transformer with a resistance meter

As one optional and additional check before you tear it apart, you can use a multimeter to perform some simple transformer checks.

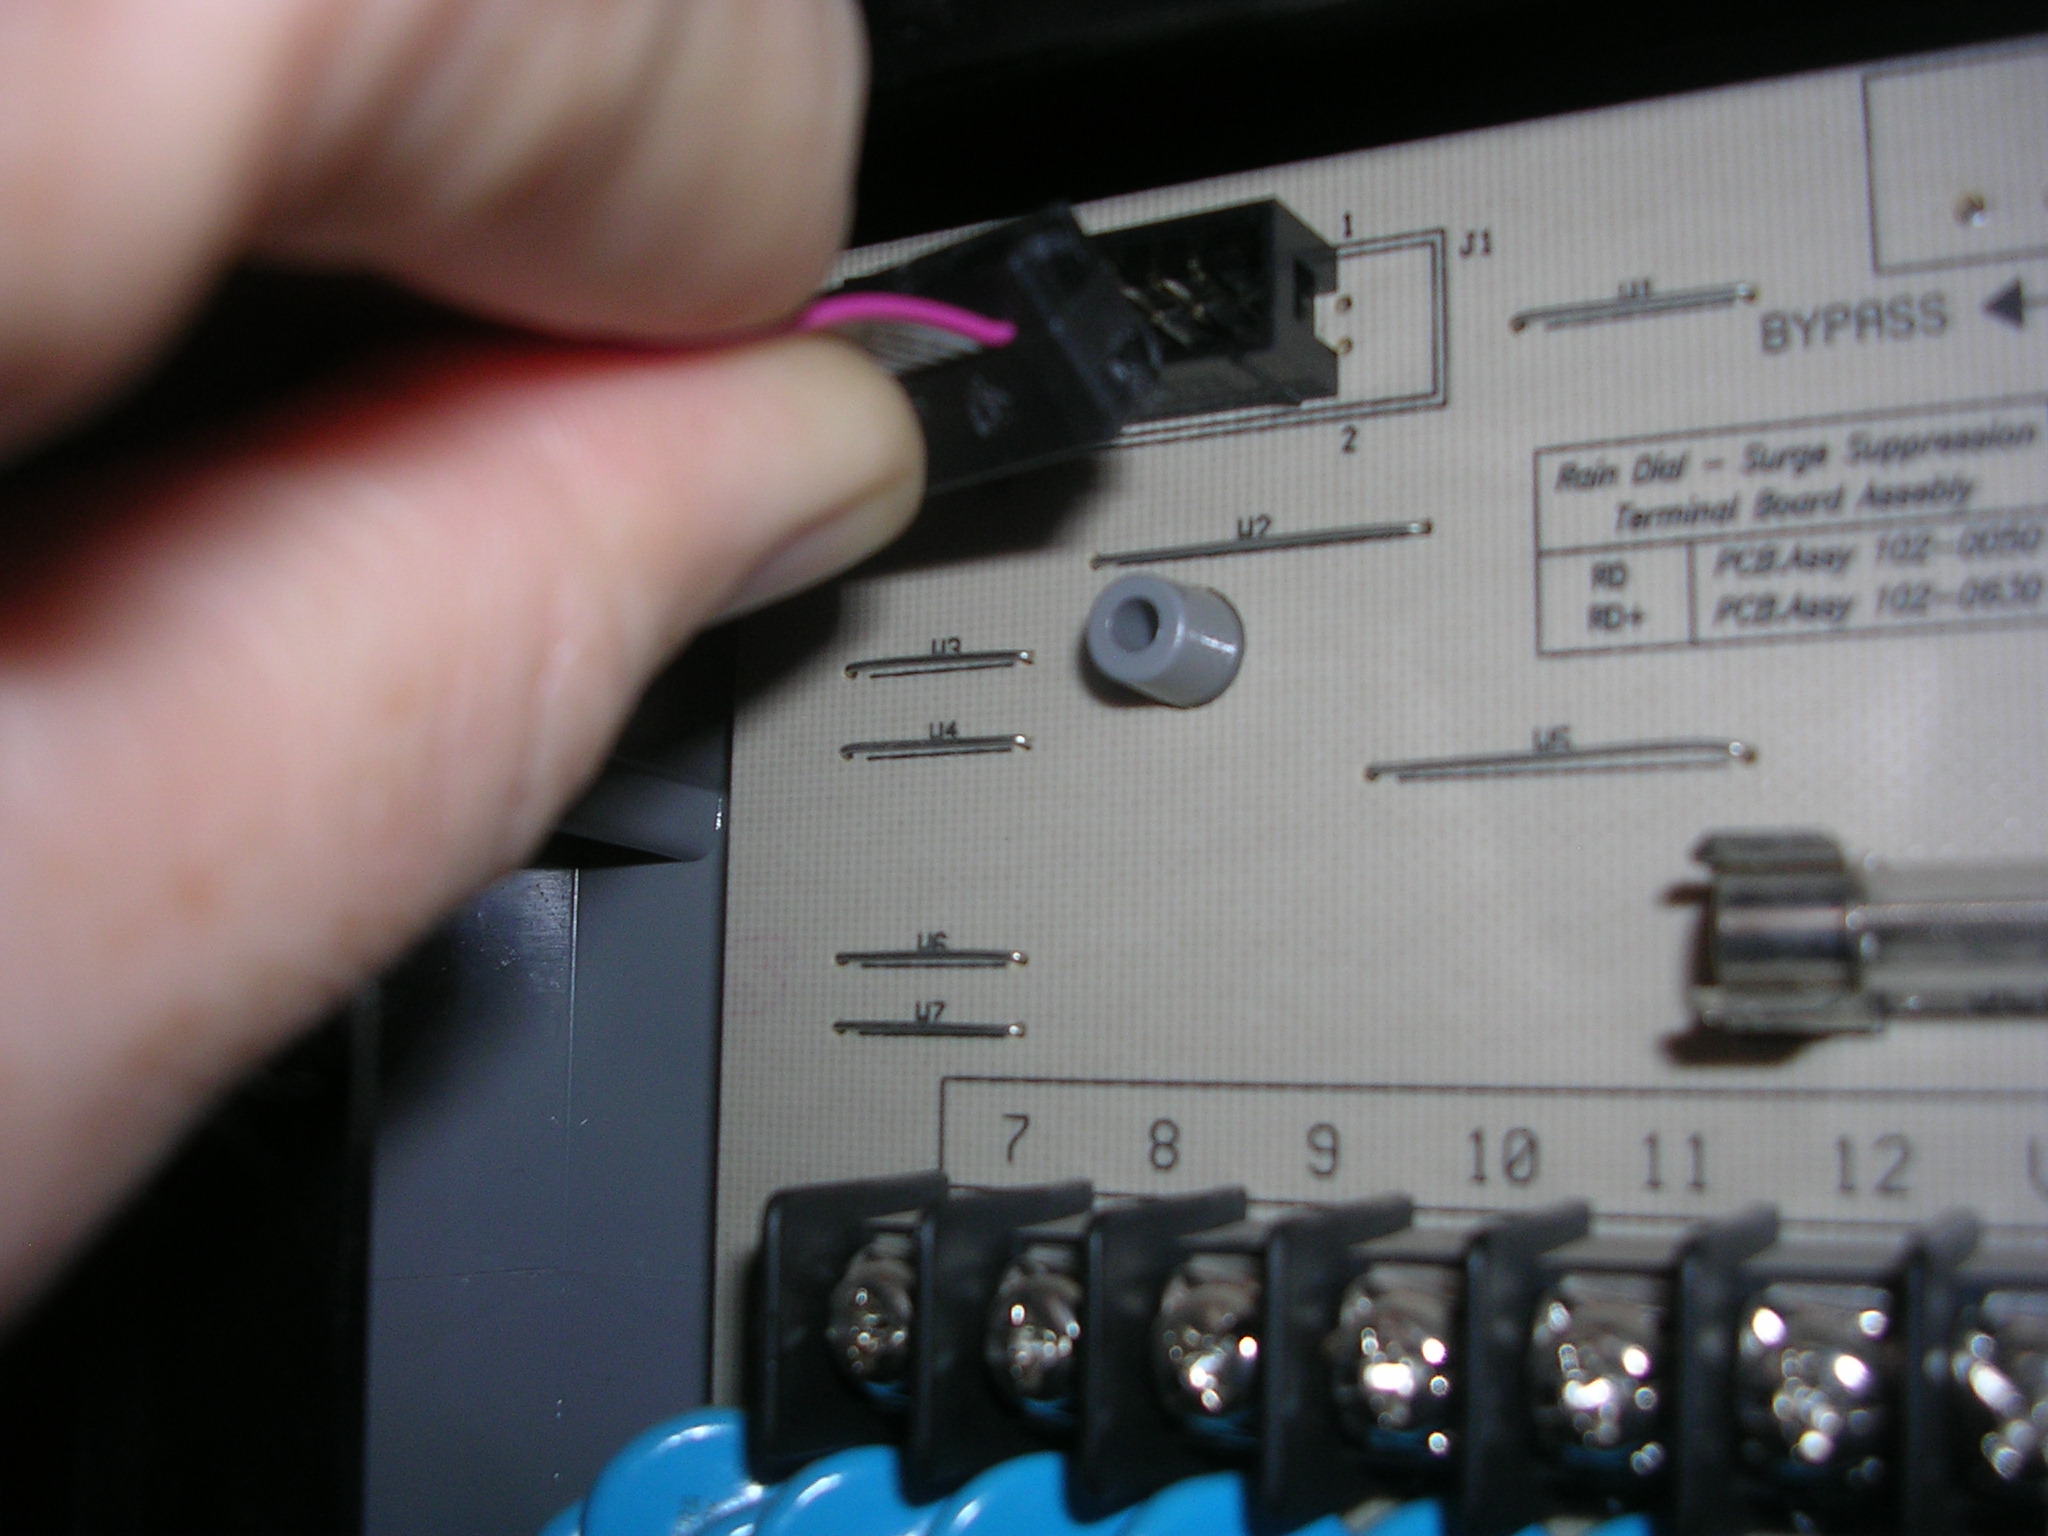
Turn off the power and disconnect the AC power connection at the bottom of the transformer case on the right-hand side.  There should be black, white, and green wires. Remove the timer ribbon cable from the back terminal board.  Your multimeter’s resistance measurement settings should be set to the lowest resistance range. e.g., 0-50ohms…

  • Measure the resistance between the transformer output wires, the thick red and yellow wires connected to the 24VAC terminals.  It should measure around 1.5-2.5 ohms.
  • Measure the input side of the transformer between the black and white wires.   This should measure around 20-24ohms.

If either one measures open, you know the transformer is bad and must be replaced.

Removing the Transformer

If you conclude that the transformer is bad, you can use the following information to help you understand how to replace it. I generally start on the left side and work my way around counter-clockwise.  REMOVE THE KEY FIRST, or it can be difficult to remove later.

After removing the case, you’ll see how the transformer is connected into the case.  You can often find them on ebay or at a local landscape supply store.It should be rated for 1.25A, 24VAC.


The transformer typically looks like this.

If this info has helped you, please consider making a donation – we depend on you to keep this information available.

Note, some newer transformers have an additional green wire coming out the bottom (reference the photo above).  Keep reading for more information about it.

2020 Update on the green wire or ground wire found on newer transformers:

Background Material for understanding grounding, green wire ground, surge protection:
Irritrol has had surge protection circuitry on their newer back terminal boards for a long time. It’s provided by those “blue” capacitor looking components that are actually MOV or TVS devices. They do not not work unless they have a ground path for surge current follow. Irritrol’s previous transformers never brought the ground wire out into the compartment where the back terminal board is for you to easily access it. It was assumed that the ‘user/installer’ would run a separate ground wire to the back terminal board for this purpose. Unfortunately, there was no way to route the ground wire from the ac mains to the compartment without drilling some holes and adding your own wire. Alternately, and preferably, the user was expected to bring in a separate ground wire through the portal with the valve wires and tie it to a grounding rod. Adding your own grounding was a hassle and expense and basically no one ever did it. I’d estimate that 99% of customers never had a ground wire hooked up at all, causing the surge protection circuity to be useless.

To fix this, (20+ years later) Irritrol started manufacturing transformers with the AC ground wire passed through from the AC Mains side through to the main compartment. There are now 3 wires; red, yellow, and green (or maybe green/yellow-stripe). Although not as good as having your own grounding rod, this is much better than nothing and now that it is “conveniently accessible”, people will or at least should use it.

Now to answer your question.
If you have a newer transformer with a green wire that wasn’t there before, connect it as follows:
1) If your terminal board has a GND or Earth Ground screw terminal, connect the wire to this terminal.
2) If you don’t have that terminal, but have a smaller, unlabeled screw terminal located below the 24VAC terminals, connect it to this terminal.
3) If you don’t have either of the above terminals on your back terminal board, simply connect the green wire ground in the VC terminal
with any other VC wires. (Usually these wires, by convention, are white, but they don’t have to be)
4) Of course, if you have your own grounding system (rod, etc.) already in place, use it instead and just cap the green wire off with tape or a wire nut so it doesn’t touch anything else.

Note that it does not matter what order you put the red and yellow wires on the 24VAC terminals; either way is fine, but “R”ed on the “R”ight is a common convention.

If this has been helpful, please consider making a donation on my site; I don’t get paid by Irritrol or any company for the service and the proceeds go towards kids education and to keep this site going.

Good luck,

Brian, Jen, Meghan and Ben – the rainDialDoctors

Understanding the RD600 Irritrol Skip Days feature

Understanding Skip days, “—” for the days of the week, and what the skip day number means

Note:   If you see — when you try to set the day of the week to on or off, it means you’re in skip days mode.  Usually, the LCD also displays “skip days”.    To turn off skip days, set the dial to skip-days and press the “-” button until it says off.  Then you’ll no longer see “—” for the days of the week.

To fully understand the skip-days setting, read the following:

Question: When I set the skip day number to 1 – does that mean it skips every other day?

Bill

—————

Hi Bill,

Surprisingly no, it doesn’t.   The Irritrol RainDial RD600 Skip days feature is often misunderstood and difficult to understand, so thanks for the question.  The short answer to your question is no.  setting it to ‘1’ will water every day.   This should help explain why:

The skip days function controls when a schedule will run.  If you were not doing skip days, you would specify the days of the week you want the schedule to run by setting for example Tuesday to “ON” and the other days “OFF”.  The timer would then run the schedule every Tuesday.   In skip days mode you are scheduling the timer to run the schedule every # days where # is the skip days value.

I like to think of the skip days feature as having a daily incrementing counter that starts at 1 and goes to the number you specify and then repeats. E.g., for a skip days setting of 3, the timer’s counter would count like this: 1,2,3,1,2,3,1,2,3. Whenever the counter matches the skip days number, the watering schedule will run. In this example the schedule would run every 3rd day.   The term skip days is sort of confusing.

Instead of ‘skip days’, think of it as ‘water every # days.’
So if it’s 2, it waters every 2nd day, which is every other day: 1,2,1,2. If you set it to ‘1’, it waters every 1 day, which is ‘every day.’

Although I’ve answered your question, one may ask:  How do I know what today is in the sequence of days?    You determine that by putting the dial on ‘Today.’  It will show you the current number in the sequence.  You can also change the number of ‘today’ by pressing the +- buttons when in programming mode.

E.g., if you have skip days set for 3 and you want it to water tomorrow, set ‘today’ to ‘2’.

As a final note, you cannot set a schedule to start based on the days of the week and skip days at the same time, you have to pick one or the other.  If you have set a skip days setting and put the dial on a day like Tuesday, it will always show “—” and not allow you to change Tuesday to “On” or “Off”.  When this happens, the display typically displays “Skip Days” to let you know why it won’t change.   
To simply turn off the skip days setting and allow the days of the week to be turned on or off, you simply set the skip days number to zero (0) which turns that feature off.

I hope this helped, if it does, consider sending us a high $5, we’d really appreciate it.
Thanks,
Brian – aka the Irritrol RD600 Rain Dial Doctor for Irritrol timers

My 9V battery keeps dying, what does that mean?

When Irritrol RainDial batteries keep draining faster than they should (usually they last at least a year or more), it is a sign that the controller is failing, but has not failed completely.

As the parts fail they can degrade slowly and the battery ends up providing power to compensate.  However, this causes the battery to drain faster, meaning it may last a week, or month instead of a year.  Eventually you’ll have to replace it more and more frequently until even a new battery won’t be enough for it to work.

There’s no way to really predict when a new battery will not be enough to make it work. One thing is for sure: “you’re living on borrowed time.”

You can wait if you want, but it’s usually better to get it taken care now, otherwise Murphy’s law usually kicks in and it’ll fail right before you are headed out on a long vacation 🙂   They often are intermittent as they’re failing, so it will not water, but when you notice the dying plants, but when you test it, it’ll seem to be working.  When it’s “on the edge of complete failure” it sometimes works, and other times not.  The temperature often effects the behavior.

Irritrol RainDial timers are well made an with a quick repair can last another 10 years. Repairs are the core of our business and we’d appreciate it if you’d select us to do the it.


What to do if the outer case door breaks off?

Irritrol RainDial Interior/Exterior Case Configurations

The Rain Dial series of controllers come in two main configurations – interior and exterior.   The exterior models have fairly solid housing and hinge mechanism.  They also have the transformer contained on the rectangular section to the right.
The interior irritrol raindial models contain an separate transformer that plugs into an AC outlet.   The hinge on the case is just a thin layer of plastic that can eventually wear down and break off.

What do do when the Case Door breaks off

Here are my thoughts on what to do with a broken hinge:
Unfortunately, there are note any good “official” solutions that I’m aware of. However, several customers have reported reasonable success with the following options:
  1. Use the extra thick black “Gorilla” duct tape; it’s very durable and has a good adhesive, better than typical duct tape.  They sell this at lots of stores including Home Depot and Lowes. 
  2. Use the packing tape that has the nylon strings built into it
  3. You might be able to add your own metal hinge to it, but that a bit more work; they sell small hinges in most hardware stores.
  4. Check with a local landscaper – sometimes they purchase the interior models because they’re cheaper and then take the controller module out of them to put in an exterior case (they’re actually the same, it’s the transformer that is rated external or internal).   Thus, they often throw out the interior case…

If anyone has other solutions, please comment below.

Thanks,
Brian
(c) copyright 2017 Brian Keller – aka the RainDialDoctor

Why does my controller say P:On or P:Off

The RD600/900/1200-R RainDial Timers may display P:On or P:Off on the LCD.

This is one of the features in the new -R series of Irritrol sprinkler timers.  It’s described in the manual in more detail but basically does this.  The Sprinkler timer has a pump control signal that normally turns on when a particular valve is turned on.  Most people I know don’t have a pump to boost pressure in their irrigation system so it’s not a common feature for the general urban irrigation system.   If for some reason you did not want the pump to come on when a particular valve was on, you can turn it off.

You can change the P:ON/OFF setting by doing the following:

  1. setting the main switch to the Set-Programs position,
  2. Set the dial to the valve you want to change the pump on/off settings for,
  3. Press the Manual-On button.  It will toggle between P:On and P:Off each time you press Manual – On.

If you don’t have a pump, it doesn’t matter whether you turn this feature on or off.  If you do have a pump, you’ll know what to do.

If you’re not expecting this to appear on the LCD, you probably need to slide the switch to the “run” position instead of “set programs.”

How does this happen? Some people try to manually turn on a valve but accidentally have the switch in the set-programs position instead of ‘run’ when they add minutes.

I hope that helps,
The RainDialDoctor

What’s the difference between an RD-600 and RD600-R

Difference between the -R and regular series connectors.

  1. The RD600-R and other -R models have additional wiring to support a rain sensor.  However, it is still possible to use a rain sensor on the older model.  Enter rain sensor in the search box for more info on that.
  2. The biggest difference between the -R models and the standard model is that the -R model has a different size connector (20 pins instead of 16).  There are adapters that allow you to convert between the two sizes.  You can also do some jury-rigging to make them work, but it’s not a “clean” solution.   Alternatively, you can replace the controller and the back-connector board at the same time, which avoids the connector mismatch.
  3. My favorite new feature of the -R series is the rain delay.  If it rains today, you can go out and tell the timer to stop watering for 3 days, or however many you want to delay.
  4. One other key difference is that the RD600-R series saves the programming in non-volatile memory so even if the battery dies, the programming will be saved.  The RD-600 will lose it’s programming if power is removed and the 9V battery is dead or missing.

Should I upgrade to the RD600-R series?

There’s no serious reason to upgrade to the newer series of controllers.  The new features are nice, but not really necessary.  The repair we do is solid and it will last a long time.  Unless the controller is in bad physical shape due to extreme exposure to the elements, it’s usually better to fix it instead of upgrade.
Contact us or enter a question/comment on the Q&A page if you have more questions.

How do I program the RD600

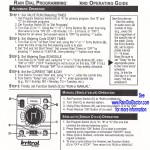
For help programming the RainDial RD600-1200 series sprinkler/irrigation controllers, see the following programming guide and then review the manuals above. This is a quick guide, not the user manual.  If you’d like to see the full manual, click here.

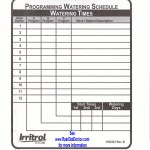
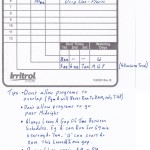
Irritrol Programming Templates and Tips

What to do if you can’t open the case door or lost your key

If you have an Irritrol RD-nnnn key and it won’t open:

There’s usually a plastic key you turn on the side of the case to open it.  While you turn it and keep it turned, pull on the door; they sometimes stick closed a bit.

Usually when this happens, it’s caused by the door having a fair bit of friction due to dust or dirt.

Try turning the key clockwise enough that you feel some resistance and give the door slow pull.  If that doesn’t work, sometimes too much pulling pressure prevents the key mechanism from turning. Try pushing the door closed more and see if the key will then turn a little more and  try pulling on the door again.

If you don’t have an Irritrol RainDial key:

(Also consider borrowing one from a neighbor to get in.  You can usually buy them on Ebay for a few bucks or call Irritrol directly.)  If those don’t work, read on.
If you don’t have a key, you can usually get into the case with a slot screw driver.  It takes some patience, but you have two methods to emulate the key behavior. The key is just a star-shaped gear that connects with another gear to lift the plunger from the hole in the case door.
1) find a screw driver about as wide as the hole, put it in and rotate it clockwise, trying to catch the teeth of the mating gear like the key would.
2) put the screw driver in the hole at a 30-degree position (about 1:30 on an analog clock) with the blade horizontal to the ground and lever it downward to about 3:00). the goal is to slide the driver into the grove of the inner gear and lever it it upward.
Forcing it open will often break the catch on the case, or the square loop in the door that it catches.  Many used timers I see have the inner door “loop” broken so it doesn’t catch any more.  There’s usually a lot of friction around the door that can keep it shut without even needing the locking mechanism to work.

To get a new Rain Dial key:

Most local landscaping supply stores (not big-box stores like home depot, but more like the landscapers supply stores that just deal with landscaping).  They should have them as well. Ebay typically has them for sale.
If not, you can contact www.Irritrol.com – look for their customer service number and they may just send one to you for free.
I hope that helps,
Brian

Ask your questions here – (They will appear shortly)

To avoid spam and other problems, your comment won’t appear until it’s been approved.  Don’t worry if you don’t see it right away.

To add a question, go to the bottom of the page, fill in the comment and click Post Comment.  

Please look at the DIY Troubleshooting section before posting; answers to most questions can be found there. 

You can also reply to other people’s questions if you like. (Thanks for helping)

Please try to include the following with your question, list:
1) the date code (located under the battery),
2) the model number shown on the face of the controller (usually below and to the left of the dial, e.g., RD-600 or RD-600-R).
3) Color (mostly Gray or Blue) based on the example rainDials shown at the top of the page.

Display says OFF or Blinks

RainDial display blinks OFF or flashes when you try to turn on a valve

Three notes about this  topic are worth mentioning

  1. A flashing display may indicate that the power has been interrupted at some point, but more often it’s an indication that the timer needs repair.
  2. Flashing Off when trying to turn on a valve almost always indicates the timer needs repair.
  3. Occasionally, the flashing is caused by a bad valve solenoid, but usually, this happens with older timers.

This page will guide you through determining what the problem is likely to be.

First do some simple checks:  You may want to read the rest of this page to be sure, but in general:

  1. If the problem happens only when turning on one particular valve and not with every valve, it may be a bad solenoid. (read further)
  2. If it happens with multiple valves, the timer likely needs repair.
  3. If you experience low water pressure, clicking, or chattering valves, the timer needs repair.

We’d appreciate your business if the following troubleshooting information suggests it needs repairing.  Thanks!

The rest of this page provides more detailed troubleshooting on how to check for a bad solenoid.

Bad solenoids are usually indicated by the FUS message, but on rare occasions, it will blink off.  Try turning on a valve manually (by selecting a valve, adding minutes with the + button) and the LCD just goes back to OFF, it’s typically one of the following:

  1. The controller is failing.  The good news is that we can help. This is a problem we repair frequently (the cornerstone of our business).  The repair is solid and well worth doing. Simply send it in for repair and we’ll have it back, working better than new (you shouldn’t ever have the same problem again).  Repair information: link.
  2. The controller is overloaded with a shorted valve solenoid or wiring problem.
    1. Newer systems indicate a shorted solenoid by displaying FUS and a little valve number on the top of the display.  You may need to put the dial in the Current Time position to see the message. Some older systems don’t show the message and just blink the display.
      1. If you see the FUS message and a number on the top row of the display that number usually indicates where the problem is.  Follow the information on this page to solve the problem.
    2. Older systems may show blinking/flashing displays but not show a FUS message when the dial is in the Current Time position.  The problem may still be a bad solenoid; here are some suggestions:
      1. Try to manually turn on each valve, one at a time.  If you find one valve that does not turn on, then that valve is probably causing the timer to blink. Read the troubleshooting tip below

Troubleshooting tips: Is the valve a problem or the controller?

A good way to tell the difference is if the problem occurs with more than one valve.  If more than one valve shows the problem then it’s a problem with the controller.  If only one sprinkler valve exhibits the problem, you can try these things:

  1. Disconnect that wire to that valve’s screw terminal that causes the timer to blink when you try to turn it on. The blinking problem should not return.  After you replace the solenoid (see below), reconnect the wire.
  2. You can also try swapping the screw terminal wire of the suspected bad valve with one that seems to be working.  If the “problem” follows the valve’s wire, it’s a bad solenoid.

If you determine the solenoid is bad, they are fairly easy to replace.  I usually take a photo of the valve to a local landscape store so they know what I’m looking for.

We hope this was helpful – if it was, use our services or consider a friendly donation.  Thank you.

Click here to contact us or here to see How do I send it in for repair?

Why is my sprinkler valve stuck on?

If you have a sprinkler valve that doesn’t turn off, or sticks on, the problem is most likely due to one or more of the following:
  1. The valve(s) are failing and it’s not a controller problem
  2. The controller is just programmed incorrectly with multiple unexpected schedules or start times.
  3. The controller is failing – causes strange behavior, seems to work, then does something unexpected.
It shouldn’t be too hard to figure out what’s going on.  The important thing to determine is if the timer is turning on the valve or it’s something else causing the problem.
The first two items below are for you to investigate, the last one I can solve for you.
Item 1: Next time the water is “on” when it shouldn’t be, turn off power to the controller, or remove the back ribbon cable (there are pictures of this on the rainDialDoctor website, see the Removal Instructions page)
This disconnects the controller from the valves, so if the valves stay on, it’s a valve problem, not a controller problem. Replace/repair the valve.
If you can’t wait for it to stick “on” again,
  • Try manually turning on a valve and then turn it off.  When you turn it off, the valve should go off within 10 seconds.  If not, the valve may be a problem. Note that the valve itself should always be put in the ‘off’ position.  The timer will over-ride it when it turns on the valve.    This makes sense because if the timer were to lose power or be removed, you would not want all the valves to go on.  Only turn the valve on at the valve box when you are testing it.
  • Re-check the programming – all three schedules A,B and C.  See Item 2 below.

If the valves turn off, it’s likely a timer or usually a programming issue. See the remaining items below.

Item 2: Go to this youTube video to learn how to program it or check the programming is correct.  The training video is here: http://www.youtube.com/watch?v=EhHTeucdKgA
Item 3: If the controller still seems to be causing problems, it’s probably just failing and needs to be repaired.  Use the contact us page to send us more information and I’ll send you the repair details.


What if a RD600 valve is stuck on, won’t turn off, or comes on when it shouldn’t?

What to do if a RD600 valve is stuck on, won’t turn off, or comes on when it shouldn’t?

(This and all information on the RainDialDoctor website is copy-righted by Brian Keller.)

Note that this information applies to the Irritrol RD-600, RD-900, and RD-1200, but the concepts presented can be applied to troubleshooting nearly any irrigation timer.

This page covers the following main topics about valves/stations being on when they’re not supposed to be.

  1. How to urgently stop a flooding condition.
  2. Understanding how the timer indicates it has turned on a valve.
  3. When valves turn on when they’re not supposed to and:
    1. The sprinkler timer display does indicate a valve should be on
      1. Determine which schedule is causing it to be on by putting the dial on the valve number and look for A,B, C to appear on the display.
    2. The sprinkler timer display does NOT indicate a valve is on
      1. Proving that the timer is not causing the problem
  4. More than one valve comes on at a time or another valve turns on before the previous one turns off.
  5. The scheduled cycle runs multiple times.

1. How to stop an urgent flooding condition.

If you URGENTLY NEED TO STOP THE WATER, turn off the timer.  If that doesn’t work, then close the valves as shown on this page.

2. Understanding how the timer indicates it has turned on a valve.

Before you read further, it’s important to know if the timer has turned on a valve vs. when the valve is on even when the timer doesn’t “think” it should be on.   Here’s how to tell the difference:

Read this link. to determine if the timer is trying to turn on a valve or not, then choose the appropriate topic below

3A. If the valve/station turns on when it isn’t supposed to and the display DOES INDICATE the valve is ON:

  1. The controller went through a reset or power outage or has inadvertently been programmed incorrectly and is now running the default program (set to every station @ 7am, every day for 10 minutes), see below for more details.
  2. Sprinkler controller schedule programming is often misunderstood; Please read the programming tips on this page.  Even if you think you’re a pro, it’s worth a quick review 🙂
  3. The controller is failing – causes strange behavior, seems to work, then does something unexpected.  Failing controllers typically cause valves to not turn on, so if they’re stuck on, it’s usually not the controller.  If you believe it is, try turning off the controller’s power.  If the valves stay on, the controller and wiring are not the problem.
  4. If you only see one number, you can confirm the timer is not causing the problem by waiting for both valves to be on, and then disconnect the wire on the backboard for the first of the two valves that are on. If you remove the wire and both valves stay on, then the first valve is faulty and not turning off properly.
    If you keep having to reprogram the timer, send it in for repair.

3B. If the valve/station turns on when it isn’t supposed to and the DISPLAY INDICATES THE VALVE SHOULD BE OFF (no number displayed):

  1. If it won’t shut off, it may be turned on manually at the valve (in the valve box typically underground) The valve itself should normally be in the off position so that it can be turned on by energizing the solenoid on top of the valve).  If turned on, nothing can turn it off. Make sure the solenoid it tight (hand tighten snugly) and also check the pressure relief screws are tight and not leaking if you have them.
  2. The valve itself is failing and it’s not a controller problem, see below for more details and how to diagnose this. We have information on how to replace a valve here.
  3. It’s extremely rare (0.1% maybe) for the timer to fail in a way that it always is turning on a valve without an indication on the display, more details follow.
To prove the controller is not causing the problem:
Next time a valve is “on” when it shouldn’t be, turn the off power to the controller, or remove the back ribbon cable as shown below; this disconnects the controller from the valves.

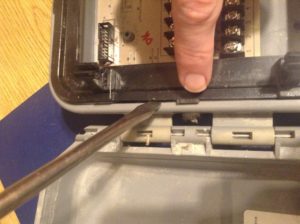
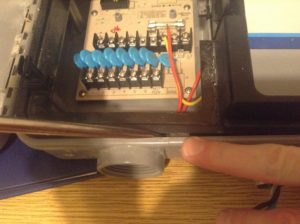
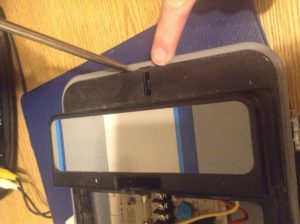
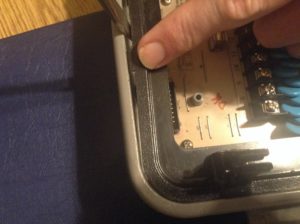
Irritrol RainDial troubleshooting – removing the ribbon cable

If the valves stay on, it’s usually caused by a problem with the valve, not the controller or any electrical wiring problem.
If you do NOT see a number on the display and the water stays on after disconnecting the wire from the backboard or removing power from the timer, it is not a timer problem and the valve needs to be serviced.
This same troubleshooting method can be used when you have a valve turn on when other valves turn on.   Remove the wire for the valve that you don’t expect to be on and see if the water stops.  If not, then it’s a valve problem that can usually be solved by replacing the guts of the valve.  See this link: https://raindialdoctor.com/how-to-replace-the-sprinkler-valve-guts/
If you can’t wait for it to stick “on” again,
  • Try manually turning on a valve and then turn it off.  When you turn it off, the valve should go off within 10 seconds.  If not, the valve is likely the problem.
  • Re-check the programming – all three schedules A, B, and C.  See Item 2 below.

If the valve turns off, it’s likely a problem caused by the controller; plug the ribbon cable back in and: 

  1. Check the programming (item 2 below).  If you see a small number on the top of the LCD display, it means the controller has turned that valve number on.  It should only do this if it’s programmed to do so.  Check the time and programming to make sure they’re correct.  If it all looks good, try the next step.
  2. Try resetting the sprinkler controller – link
  3. You’ve done all you can, the problem seems to be the controller; we can repair it.  (Item 3 below)
4. If more than one valve turns on, or another valve turns on before the previous one turns off. 
A little lag between one valve turning off and the next one turning on is common and usually not a problem.  It shouldn’t be on for long though.  This lag is usually due to slow operating valves.
In general, the sprinkler timers are intentionally designed to not turn on more than one valve at a time.  This is done because there is usually not enough water pressure to turn on too many valves at once.   If you are not intentionally trying to turn on more than one valve, then it’s probably due to one of the following:
If more than one valve turns on at a time, it is usually caused by one of the following:
  1. Incorrect programming.   You may have overlapping schedule times where one schedule turns on a valve while the other schedule has on a different valve.
    These problems are usually caused by a failing valve.  To know, look at the display.  If you see two numbers appear on the top row, it’s a programming problem; review all the scheduled programming and if needed, perform a factory reset and reprogram.
  2. Wiring problem:  if you have wires crossed or shorted to each other, it could cause one valve to come on with another valve.
  3. Valves are failing: sometimes the change in water pressure that’s caused by a valve being on can trigger another valve to turn on.  This is uncommon.
5. If a schedule runs back to back or twice in a row. 
This usually is caused by overlapping start times.  If another start time is reached before the timer finishes running the current schedule, it will start the schedule as soon as the prior one finishes.  Check all programming on all schedules and when in doubt, do a factory reset (see DIY Troubleshooting page for more info.)
Note: If you repeatedly have problems with programming or times changing, you should send it in for repair.  However, if you think you may have a programming issue, go to this Youtube video to learn how to program it; it’s actually pretty easy and the video does a nice job.  It should apply to just about any model similar to the one shown.
The Irritrol RainDial RD600 series Training video is here: http://www.youtube.com/watch?v=EhHTeucdKgA
  • Note that older timers will reset on a power outage to turn on every valve, every day at 7am for 10min.  Double-check the programming has not changed unexpectedly.
  • Day of the week or time of day – watch out for the subtle difference between the A and P in AM/PM.  It’s the only complaint I have about the Irritrol timers.
If the RD-600 series controller still seems to be causing problems or is just acting strange, it’s probably just failing and needs to be repaired.  This is VERY COMMON and likely the cause. I do this all the time and the success rate is near perfect, cost and time are reasonable.
Contact us for more information.